Dental Photography settings 2021
GET YOUR FREE Dental photography Camera Settings PDF NOW!
Okay! If you’re anything like me, you would want to get started straight away and start taking pictures as quickly as possible without confusion.
Well luckily for you, you don’t have to go through the confusion that I did.
In fact I have broken the settings down into beginners and advance if you’re more technical and want to enhance your images.
In this post I’ll cover:
- WHY SHOULD YOU USE DENTAL PHOTOGRAPHY?
- BASIC CAMERA SETTINGS
- ADVANCE CAMERA SETTINGS
- FAQS
If you want to know more about camera set up then you can also check out our post on
- DSLR camera for dental photography
- Lens for dental photography
- Ring Flash for dental photography
- Twin flash for dental photography
- SEO DENTIST SUCCESS 2021 Update
Let’s Begin!
Why should you use dental photography?
Let’s get straight to the point.
Dental photography is used to capture our work to improve our clinical skills. Dentists also use these pictures to build a portfolio so we can use them for marketing, advertisement and patient education. Furthermore, you can also use them to communicate with our Dental lab technicians for aesthetic cases
We also need them for record keeping as they can be beneficial legally.
But the main question is ‘What Settings do I use for my camera for dental photography?’
HERE is the answer!
BASIC CAMERA SETTINGS – Dental Photography settings 2021
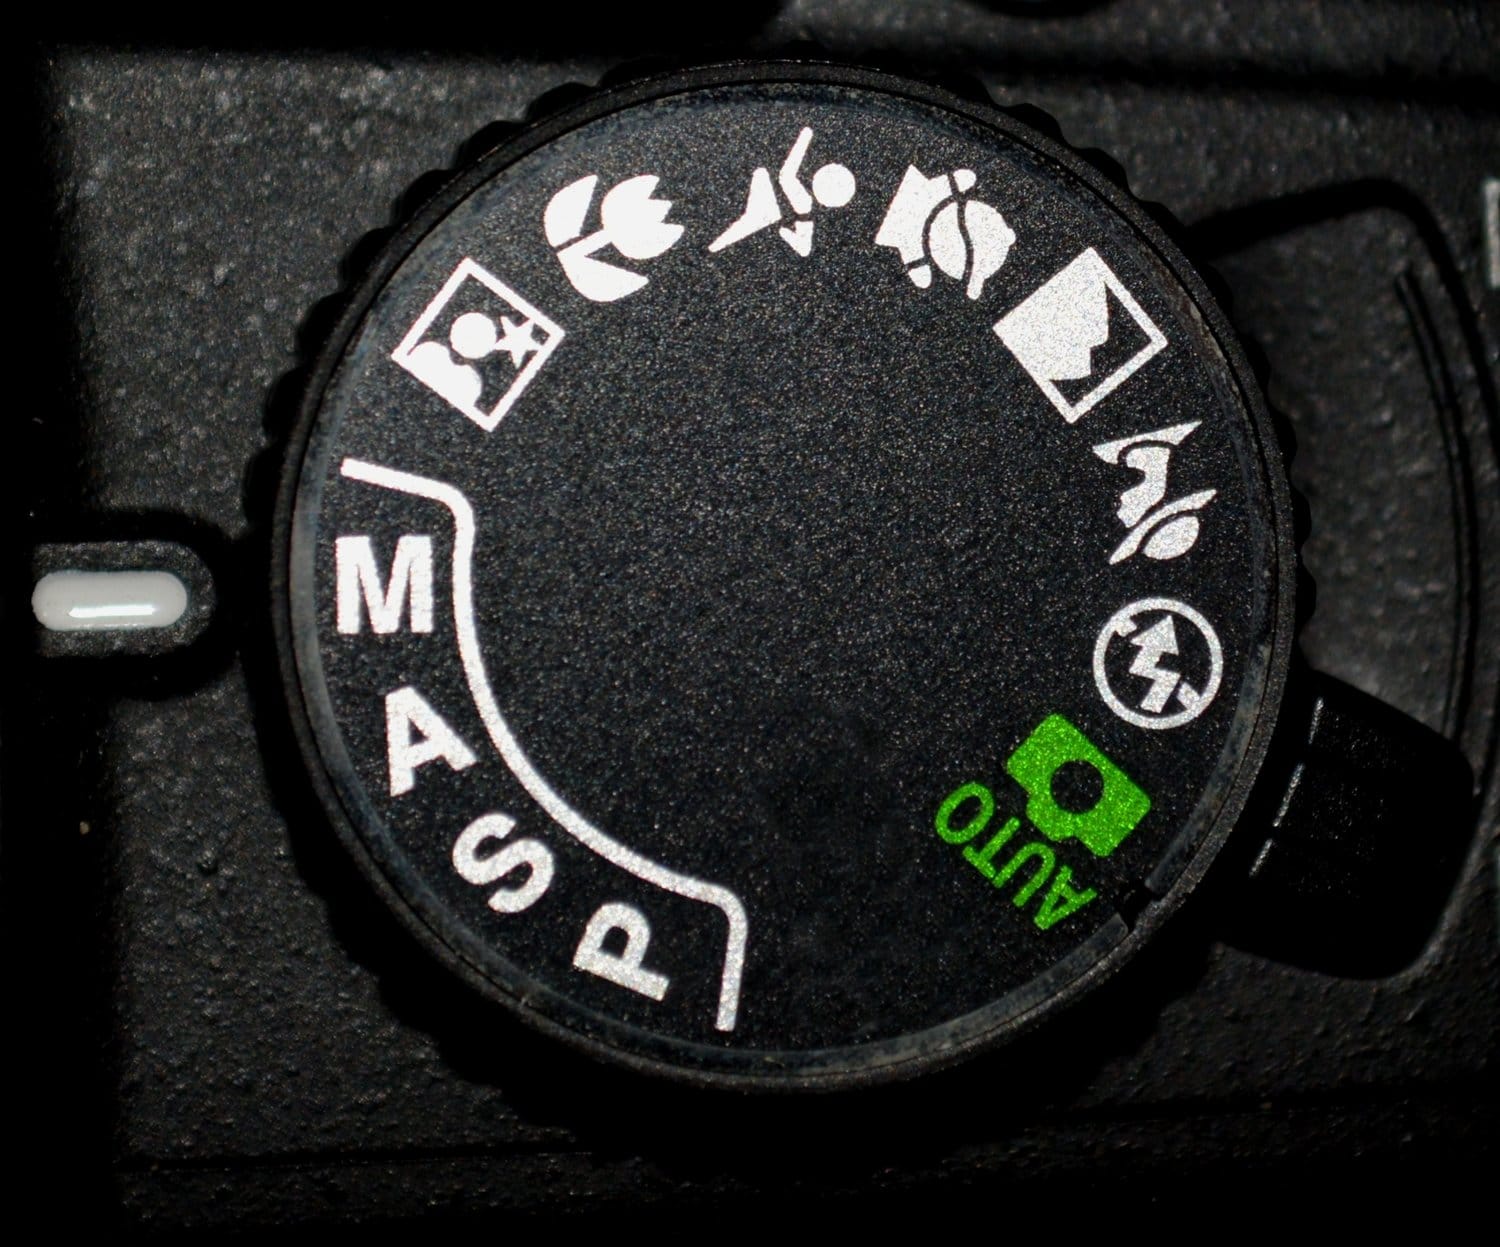
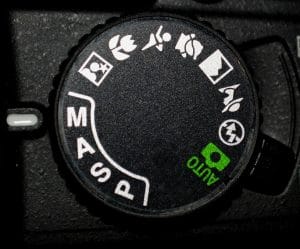
ALWAYS MANUAL
You want as much control over your settings as possible, so its a no brainer that you should chose the Manual (M) on your camera wheel then we are ready to go.
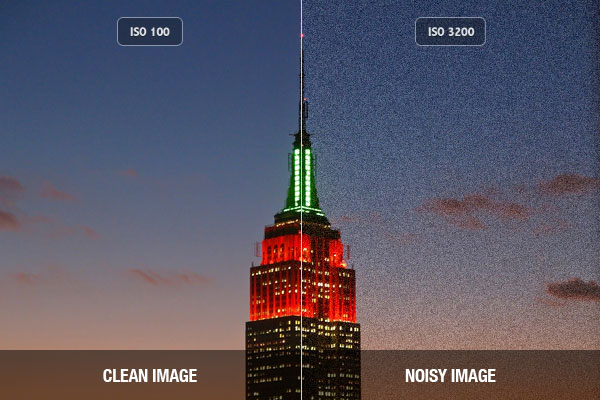
ISO 100
ISO is the level of sensitivity of your camera to available light.
The lower the ISO number, the less sensitive it is to the light which is what we want with Macro dental photography.
This creates a clean image with no noise. Where as a higher ISO number increases the sensitivity of your camera meaning your pictures are going to be brighter and exposing it to more noise.
So put your ISO on 100 and do not change it again for dentistry.
Here is an example of a same image with low and high ISO.
Shutter Speed 1/200
Shutter speed is the length of time your camera shutter is open, exposing light onto the camera sensor.
Essentially, it’s how long your camera spends taking a photo. This will effect the sharpness of your images. In the example below you can see the the difference in shutter speeds and the effect it has on our images.
Higher shutter speed would mean that the camera shutter is open for longer amount of time, capturing more ambient background light and thus making the picture blurry.
Lower Shutter speed would mean that the camera shutter is open for a fraction of a second. Which mean that there is less light hitting the sensor, reducing the pick up of ambient background light allowing the picture of your desired object to be still and crisp.
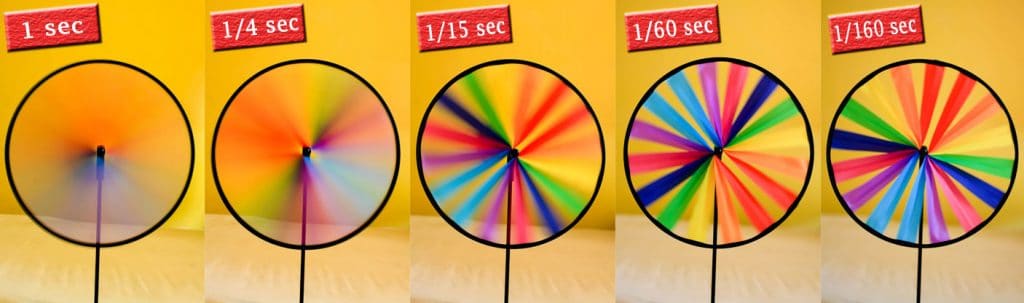
DENTISTS LOVE COFFEE!
However, this can make our hands a little shaky and as a result we NEED quicker shutter speed.
Set your Shutter speed on 1/200 to minimise any movement and blurriness and your images will be as sharp as a knife…(metaphorically speaking that is).
On Nikon cameras shutter speed can be quicker so take advantage of this if you are a Nikon hero!
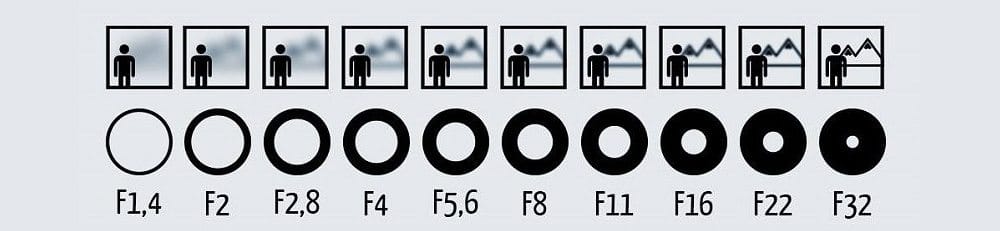
F Stop (11, 18, 29)
Aperture is a hole within a lens that light travels into the camera body.
Just think about how your eyes work. As you move between bright and dark environments, the pupils expands or shrinks.
In photography, you can shrink (Higher F stop) or enlarge the size of the aperture (Lower F stop) to allow more or less light to reach your camera sensor by changing your F stop.
This also effects the depth of field in the picture.
The lower the F stop, the less depth of field on your camera. This means that the distant off-centre objects from the lens become blurry.
Whereas, the higher the F stop the higher the depth of field, meaning the objects off the centre of the image and further away from the lens became more clear and crisp.
This image explains it better.
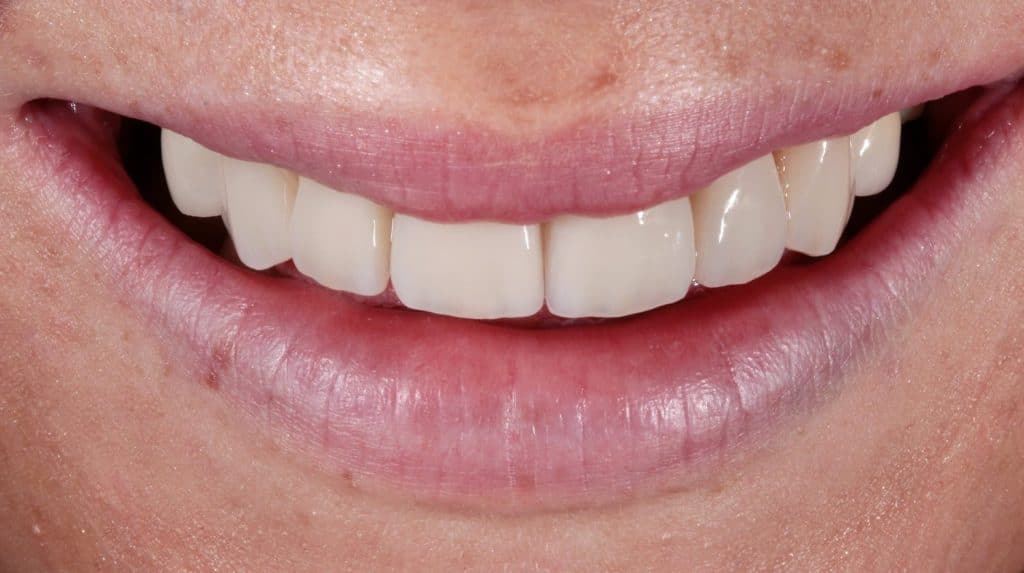
F STOP 11 – FACIAL PORTRAIT IMAGES
I recommended F 11 for full face shots as we do not require full depth of field as we do with pictures intramurally.

F STOP 18 – Artistic
18 is recommended for artistic extra oral pictures such as this.
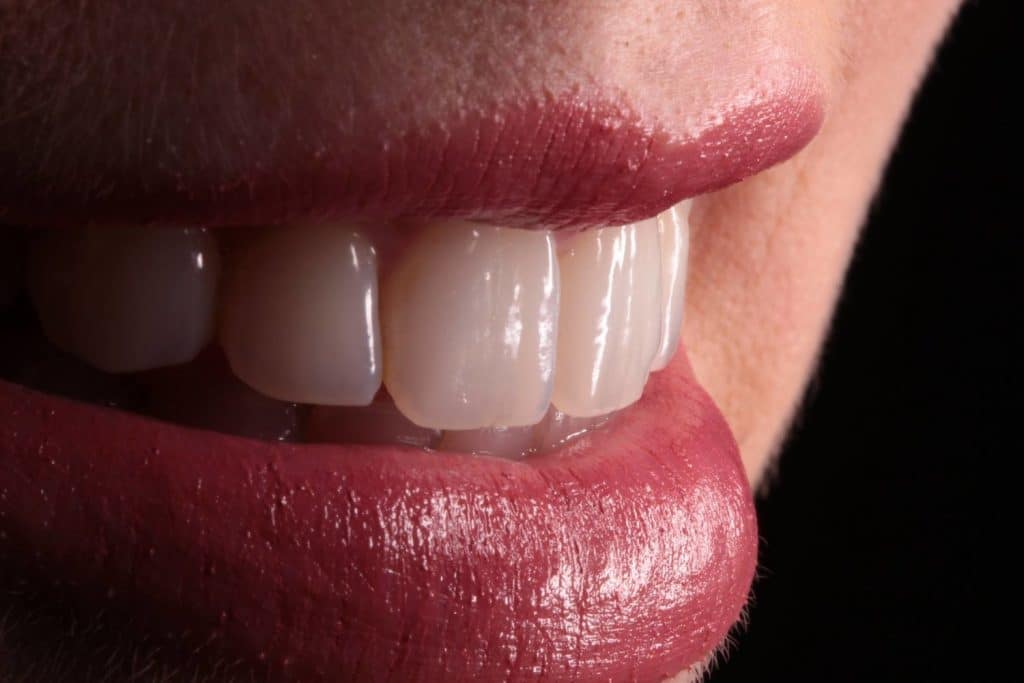
F STOP (29-32) – Intra oral Close up
This is what I would recommend for intra oral pictures.
The higher the F stop the clearer the image so why stop at F22 when you can go higher and your ring flash can provide enough light to get crisp picture.
Raw + L JPEG
Now that you have this set up ready, make sure to choose to save the images on your camera as Large JPG and Raw File.
Raw Files can not be edited and if they are they leave a trail meaning that the original photo can be recovered. This is useful for medico-legal purposes and publishing purposes.
One catch… RAW files are large in storage. 20mgb per picture.
Large JPEG format is smaller in size (5-6mgb per picture) which makes it easier to transfer and they are also compatible for editing in term of marketing and production.

TIP: You may need an external storage to store all your images.
HERE IS THE SD CARD and STORAGE DRIVE WE RECOMMEND:
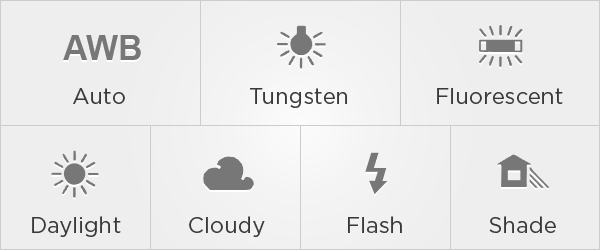
White Balance – Flash
White balance (WB) is the cameras way of removing unrealistic color casts, so that any objects which appear white in real life are projected white in your photo.
This alters the rendering of natural blue and yellow light within you photo too.
In dental photography, you want to stick to flash photography, thus you want the natural colour of the objects in the shot to be render when exposed to flash.
So, go to settings, Select White Balance and Chose Flash.
ADVANCE CAMERA SETTINGS – Dental Photography settings 2021
By now, you should now know what settings to configure your camera to in order to be ready to capture those shots you always wanted.
BUT…
I have come across some further settings that are not mentioned in your basic photography training that you can activate with your DSLR to further enhance your images.
Let’s Begin.
Centre Weighted Metering
Now a days, every modern DSLR cameras have a setting called “Metering Mode”.
This is your cameras way of determining what the correct shutter speed and aperture should be. This also depends on the amount of light that reaches the film in the camera and the ISO.
This can get a little confusing, so ill cut straight to the chase.
You want to select Centre Weighted Metering which looks like this.
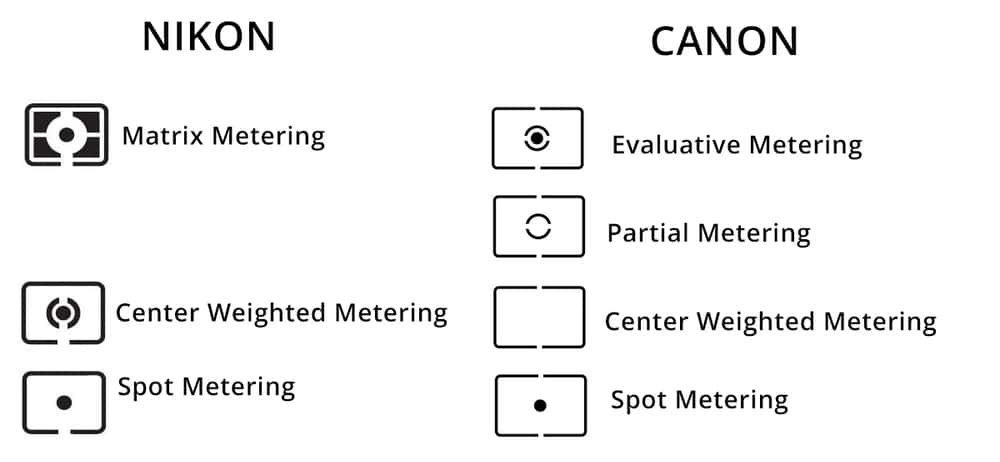
Center-weighted Metering prioritises the middle of the frame by evaluating the light in the middle of the frame and its surroundings and ignores the corners. This is great because it will expose the teeth correctly.
sRGB
By selecting this, your DSLR camera will produce images that are vivid with natural colour representation.
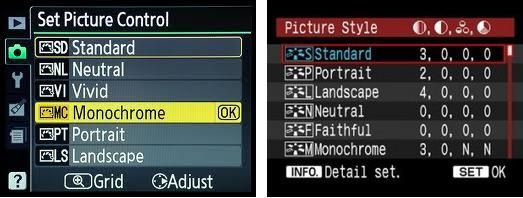
Picture Control Setting
Now this has the same effect on both Canon bodies and Nikon bodies.
However, they have different names. Picture control setting in each DSLR body will enable you to have more control of the images that you take.
If you have Nikon body then I recommend you select ‘VIVID’.
If you are a Canon body owner I recommend you use ‘FAITHFUL’.
This will give you a distinct,fresh-looking colorful images with the right emphasis on your subject’s contrast and sharpening.
This is ideal for dentists as it helps emphasise primary colours and give a natural contrast between teeth, gums and lips.
There you have it.
These extra settings that you can add on to your basic settings will give you a more crisp and ‘punchy’ image.
FAQ- Dental Photography settings 2021
Q: I used the same settings but the image is still coming out dark… what am I doing wrong?
A: We recommend that you check that your F stops are appropriate for the image you are taking. Secondly, we would recommend that you check your flash and the strength of the battery in your flash device. you can always find our Ring Flash and Twin flash recommendations in our blog posts.